This is the second of three posts related to the planning process for my Cape Wrath Trail walk, in May 2019. This post is going to look at kit, not so much the kit I plan to use, but at the Kit List spreadsheet I have developed that allows me to find the best mix of comfort and weight. This is a bit of a nerdy topic, so feel free to skip this one if you have your own kit management system, or indeed you don’t bother and are happy to just throw what you think you’re going to need into your pack and head out the door.
The first planning post can be found here (Cape Wrath Trail Planning #1) and it covers the basics of getting to and from the walk, the route selection process and my choice of navigation tools. It also discusses why I feel the need to plan walks like this in as much detail as I do – a little look into the jumbled mass of thoughts and emotions in my head perhaps?
The Spreadsheet
This spreadsheet evolved from a need to select specific items of kit for a walk, depending on the length of the route, the type of walk (day walk, multi-day B&B walk or backpacking trip) and the season. Like most regular walkers and long-distance walkers in particular, I have quite a large selection of kit in my ‘cupboard’ and it soon became quite an arduous process creating a kit list for a walk.

I’ve looked at loads of different solutions for this problem. I’ve downloaded other people’s spreadsheets and tried them and I’ve tried a couple of different online tools that looked promising, but these all quickly proved too simplistic or too restrictive. It soon became apparent that nothing worked quite the way I wanted, so I was going to have to come up with something of my own.
I started out with an Excel spreadsheet – simply a list of all my kit, each item with a category, a description and a weight. Over the course of about 3 years this has morphed into a Google Sheet (easier to access anywhere and easier to share if needed) with two tabs; tab 1 is the full kit list and the tab 2 is calculated from the items of kit I select on the first tab.
As well as Category, Item Description and Weight, tab 1 has an ‘Include’ column, all items have this set to ‘No’ by default. If I make this ‘Yes’ the item gets passed to the generated kit list in tab 2. For ease of spotting which items I have selected, I use a conditional formatting rule to turn the description of the item blue. The top line of the sheet maintains a running total of my base weight, pack weight and skin-out weight.
Base weight is normally classed as all items in your pack (including your pack), but excluding consumables like water, food and fuel. This is the measurement used to define your backpacking philosophy (for want of a better word). Although definitions are somewhat fluid; less than 5kg would be considered Ultralight, 5-10kg would be Lightweight and above 10kg is a traditional load.
Pack weight is your fully loaded pack at the start of the walk, so it includes a litre of water, all your food and your cooking fuel of choice.
Skin-out weight is the least used measurement of your equipment and quite literally means you count everything from your skin out. It includes your pack weight, all the clothes you wear, your shoes, socks, poles, the whole shooting match.
Items are either ‘worn’ or ‘carried’. Worn items do not count towards my base weight and as well as being the stuff I’m wearing these may also include walking poles that are ‘in-hand’. When I use a pole, I tend to walk with just one, but when I’m backpacking I need two for my shelter, so the other one needs to be ‘carried’. The sheet allows for this in formula and counts one pole as worn and one as carried.
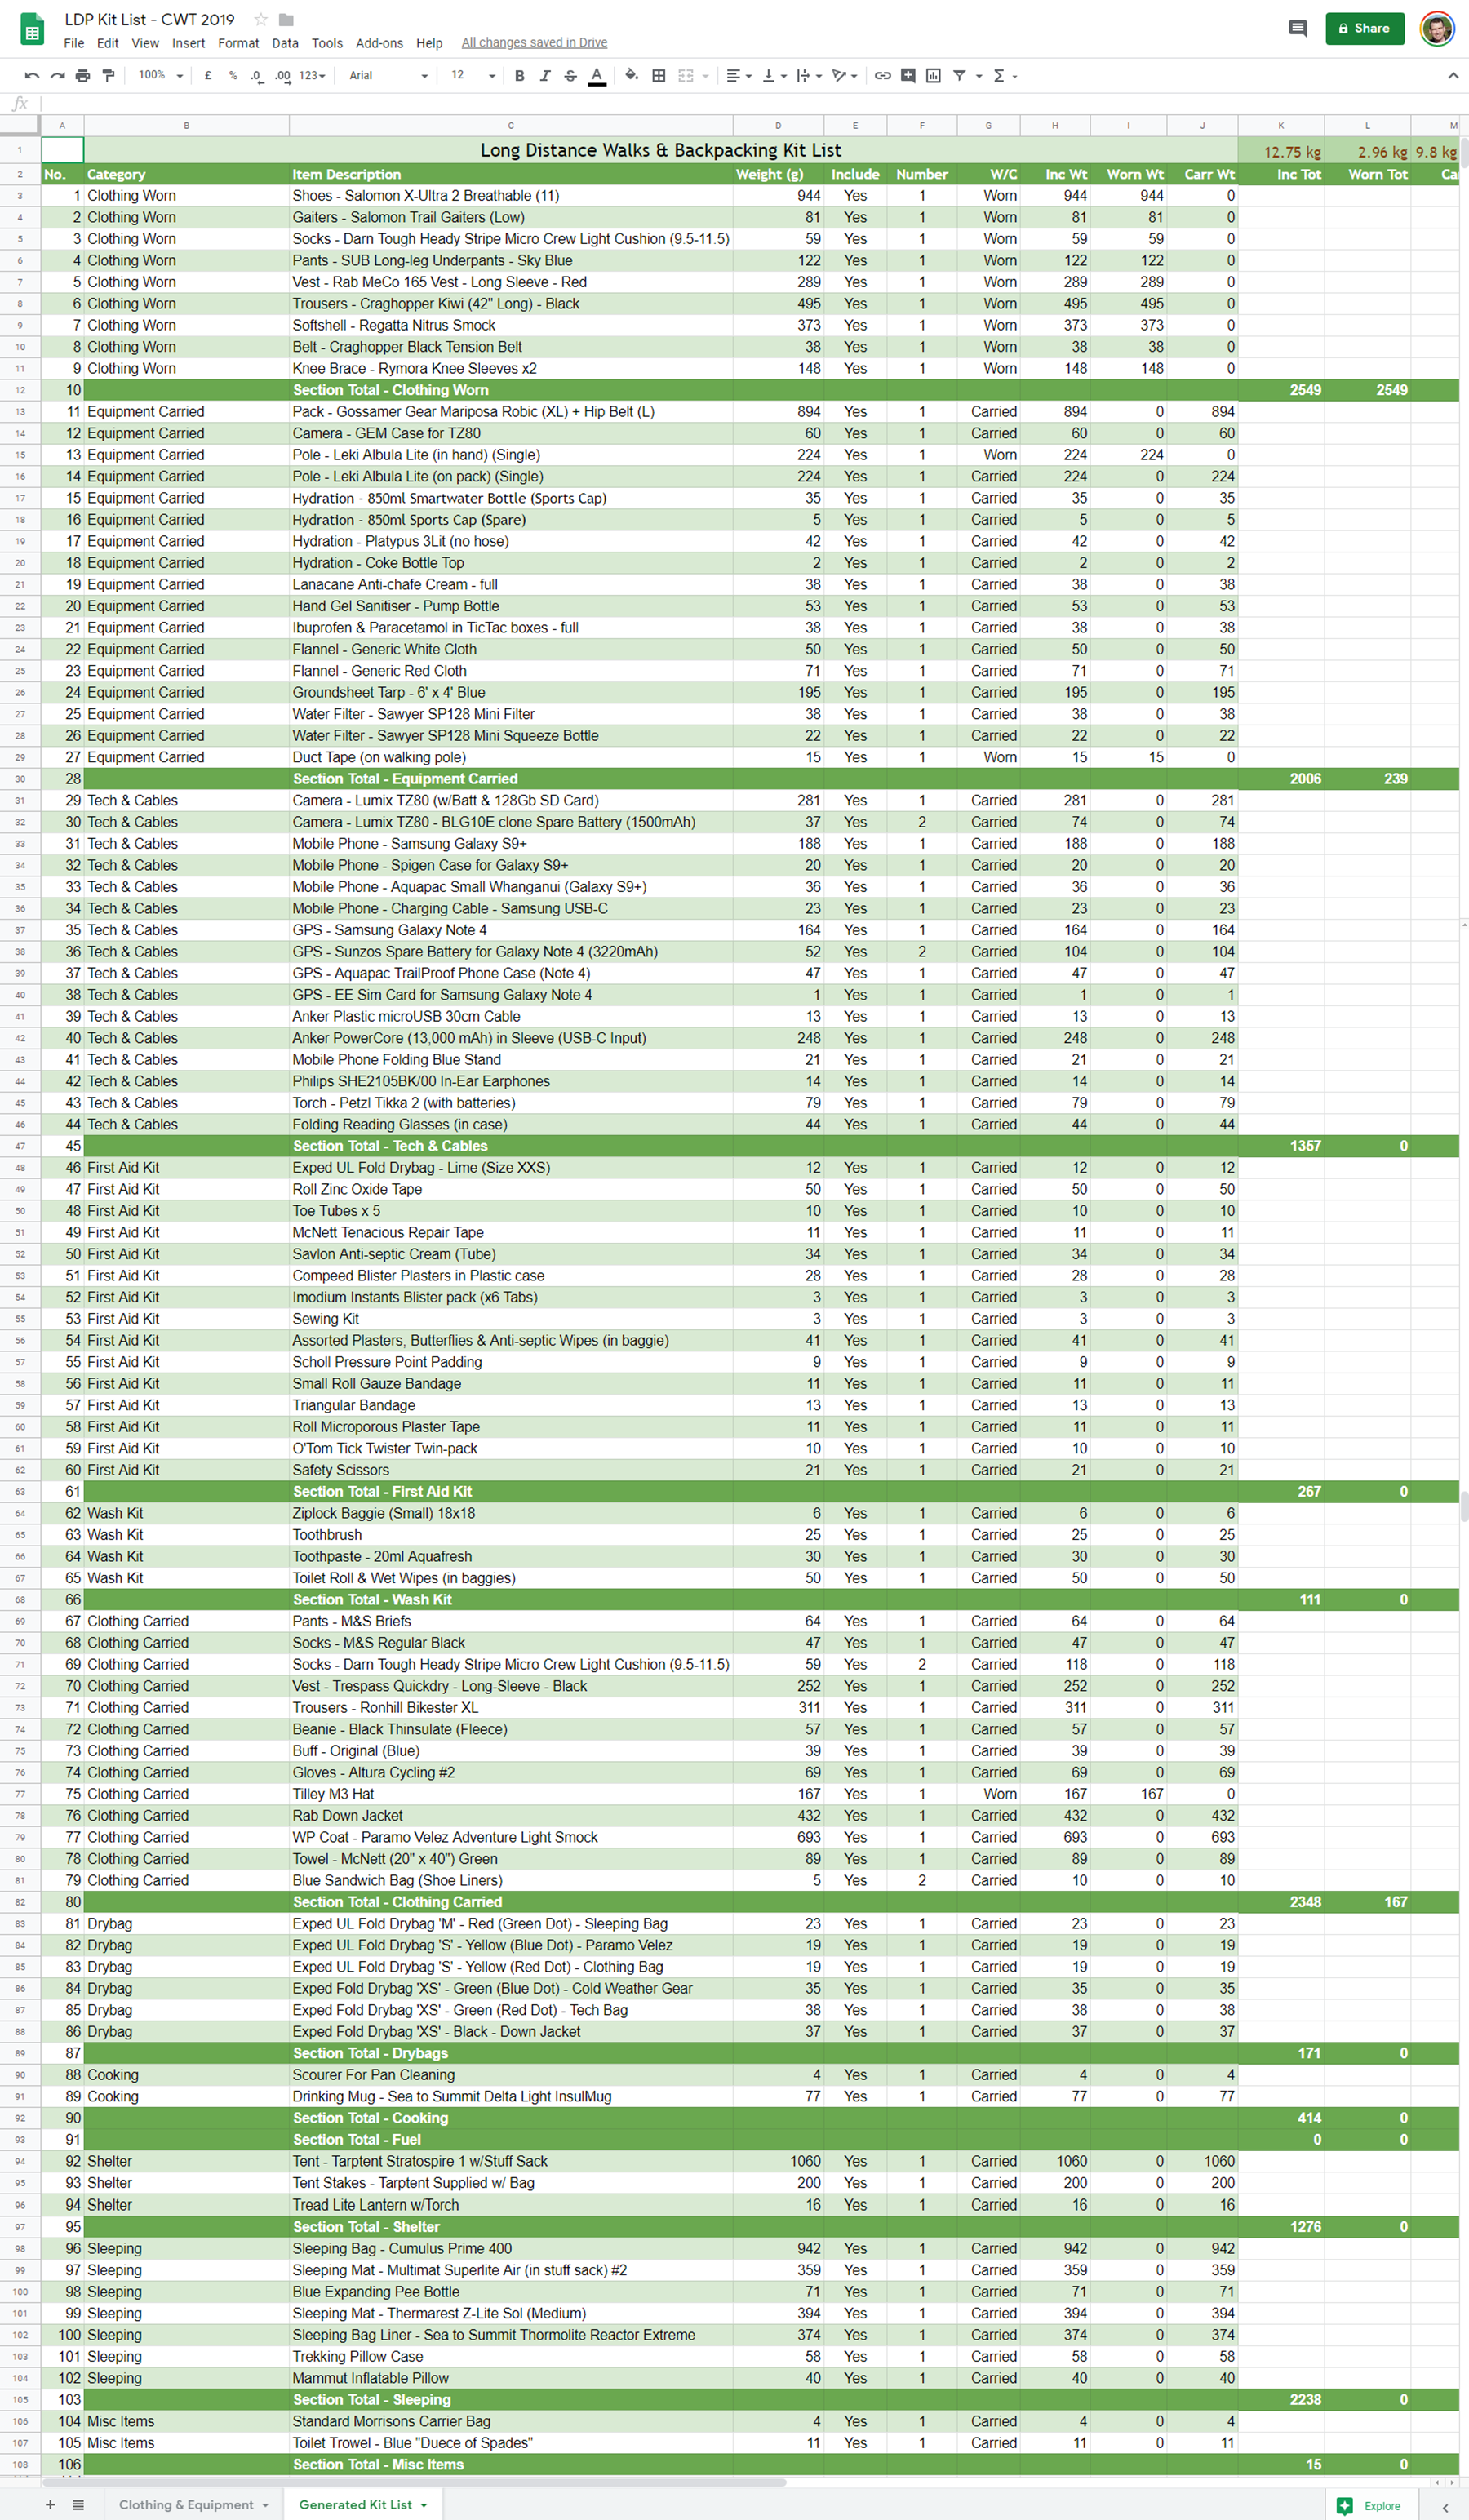
The sheet is divided into sections, one for each category of kit; Clothing Worn, Tech, Shelter, Cooking, etc. Each section has sub-totals so I can easily see where my weight is distributed and therefore where I need to concentrate on weight saving, or where the best gains can be made. The video below shows how the sheet works.
The video begins by showing tab 2, my ‘Generated Kit List’. As nothing has been selected in tab 1 yet, this list is empty, just the lines for the category sub-totals are visible. I then click across to tab 1 and scroll down the sheet selecting the items I want to include on this trip. Google Sheets will auto-fill after the first character, so I only need to hit ‘y’ and it populates the cell with ‘Yes’. This results in the weight of that item being added to the category sub-total and the overall total in the top right. Depending on whether it’s a ‘worn’ item or a ‘carried’ item, the appropriate column is updated. At the same time, the item is colour-coded so I can quickly see what I’ve selected.
I make my way down the length of the sheet (there are currently 278 rows) selecting the items I want. When I’m done I can switch back to tab 2 and see my generated kit list for this walk. I have an extra column on this sheet, called ‘packed’ which I can complete when I have the item stowed in my pack. This means tab 2 becomes my tick list when I’m packing.
Cape Wrath Kit List
So, what kit am I actually taking with me on the trail? This list in the image below is my current favourite list, but that may well change closer to the time, depending mainly on the weather forecast for the days I will be away. If there’s generally high pressure likely then I will probably stick closely to this list, if there’s a depression coming in or likely to come in, then I may throw the waterproof trousers back in and maybe add another mid-layer.
Sleeping
You may notice that almost 25% of my base weight is comprised of my sleep system. If I really wanted, I could reduce this by 750g straight away, by losing one of the mattresses and the sleeping bag liner, but I’m not prepared to compromise on my sleeping comfort. I sleep cold anyway, so the liner is a real bonus in terms of warmth (adding 12C to the comfort rating of the bag, according to the blurb) and it helps to keep the bag clean at the same time.
I am no longer prepared to rely solely on an air mattress for a long walk, I’ve burst too many to count, but at the same time, they add so much comfort to a night in the tent that I’m not prepared to go without one either. I’m a big bloke, so it’s not surprising that I burst air mattresses. So I’ll take one, but if it dies I will still have the Z-lite to fall back on – this is essentially a solid foam mat, so it can’t fail.
Paramo Jacket
Another item that may spark discussion is the Paramo Velez Jacket – this is way too heavy by traditional lightweight backpacking standards, but I just love it so much that it’s pretty much the first item on my list. I have lighter jackets but they aren’t warm, so I’d need to carry another thermal layer of some kind for the Scottish mountains in May. It doesn’t make me sweat like Gore Tex does and I love the pocket configuration. The large chest pocket fits gloves, phone and snacks, the side vents can be adjusted so I can slip hands inside (like a bomber jacket) and keep them warm and the belt of my pack slides inside rather than over the top, which is nice.

Photo courtesy of Chris Pilgrim
Footwear
I’m not using boots – in fact I may never wear boots ever again! Boots are never going to keep the water out on a walk like this, they will almost certainly become sodden and heavy footwear will become even heavier. The waterproof liner means that wet feet stay wet too, and heat up, which is a perfect recipe for blisters. I’ll be using my Salomon X-Ultra trail shoes, which admittedly mean that you’re walking in wet feet all day, but they are light, let the water out and let your feet breathe much better than boots. I’ve found a combination of shoes and socks that work perfectly – Darn Tough Merino socks are brilliant, they have built-in padding in the sole and they seem to support my feet much better than all the other trail socks I’ve tried.
Camera
I could save weight by not carrying a dedicated camera, just using the excellent camera in my phone, but I love the images produced by a decent compact zoom camera and the flexibility a zoom lens gives you when composing images. I also find the Samsung cameras to be quite ‘harsh’ the Lumix TZ series seem to have a slightly softer feel to them (I’m no camera buff so not sure what the reason for this is). I will carry two spare batteries for the camera (40g each) and they should last me 8 days.
Water
I’ll be using my Sawyer Mini water filter on the walk, I’ll rely on this alone to clean the water from burns and lochs. I would normally walk with a 2 litre hydration bladder, but in order to cut some weight I’ve decided to switch to a standard 750ml plastic water bottle. The abundance of water sources along the trail mean that I’m not going to have to carry 2 litres at a time, I can fill my bottle whenever I cross a stream, so I’ve reduced my pack weight by over 1kg. I’ll be carrying my 3 litre ‘dirty platty’ as a camp reservoir, filled as close to the point we pitch as possible, or after pitching if we’re beside water.
OK, this post has gone on long enough, so I’ll leave it there. I’m happy to answer any questions anyone may have on the spreadsheet (you’re welcome to a copy if you think it will work for you), the kit selection thought process, or anything else for that matter. Keep an eye open for the third and final planning post, how I create my route card.