Updated January 2021
Printing
You can find the previous part of this guide here: Part 4 – Working with Routes, Tracks, Marks & Overlays
Part 5 of this parallel user’s guide covers Printing. Your purchase of MM maps could save you from ever buying a paper map again. You can’t recreate the excitement of unfolding and laying out a new OS Explorer sheet of course, especially when the maximum print size is A3 and realistically that becomes A4, because who has access to an A3 printer?
One of the great advantages of MM is that you can print your own maps, again and again with different routes highlighted on them each time and there is no license fee to pay to Ordnance Survey, at least no more than you already paid as part of the digital map purchase or subscription.
A half decent colour printer is a requirement here of course, but most modern ink-jet printers will produce a perfect copy of an OS map, certainly good enough to go out walking with. For added peace of mind while out walking, you can also purchase waterproof paper to print your maps on. Toughprint Waterproof Paper, on Amazon.
The printing options are accessible through the Map > Print or Map > Print Route/Track menu options. The second option will only be available if you have a track or route highlighted. You can also access them by right clicking a route or track and selecting Operations > Print Route (or Print Track)
Before we go into detail on each of these options, just click Map > Print… and let’s have a look at the printing dialog box that we have to work with in almost all our printing activities. We’ll look at each of the panels in this dialog box, in turn.

Scaling Mode: The first thing we need to decide is whether we want to print a selected area onto a single sheet of paper or whether, more realistically, we want to print at a fixed scale and spread the area of printing over a number of pages. I almost exclusively use the latter. I see very few applications where the first option would actually be useful, but you should make your own decision here.
If you choose the ‘Print at a fixed scale’ option, you then need to select the scale you want to print at. Remember, the most detailed OS maps are 1:25K, but with MM you can print whatever scale you like. I tend to aim for about 1:17K which gives the best mix of detail and coverage. It’s important to note that you don’t get more detail by printing at say 1:17K (not like moving from a 1:50K OS map to a 1:25K map), all that really happens is you basically zoom in to the map you’re printing, like using a magnifying glass on a paper map.
Again, you need to decide which scale works best for you. If you’re walking across hills or moorland then a scale like 1:25K will be fine, if you’re doing lots of field or town walking then the extra zoom offered by 1:15K may give you better visibility of the field boundaries and streets etc.
Grid Overlay: The Grid options allow you to create your own 1Km grid lines, over the top of the OS grid lines already provided on all OS maps. I’ve never found a use for this, but you may. You can define the colour of lines, the line width and whether you want tick marks (Labels) down the borders of the map.
Title: You can specify a title for the map, which will be printed in the top left hand corner of the final printed version of the map, along with a page number and total page count (‘1 of 4’ for example) if you are printing a route that runs over multiple pages. The name defaults to the name of the map you’re printing, or the name of the route or track.
Copies: is obvious I think.
Margins: Allows you to add white space around the edge of the map you are printing. Again I’ve never found a use for this, but perhaps if you want to annotate a map it may be useful. You will need to experiment with the values (inches) to see what works for you.
Relief Shading: This option lets you print relief shaded maps, producing a 3D effect using shadows to represent the difference between high ground and low ground.
You can adjust the brightness and contrast for the shading and the position of the theoretical sun.

I tend to use this option for printing maps I’m going to use on my website or in a guide book and not so much for daily maps I’m using on a walk. You can find your own setting by trial and error, but 100/80 seems to be about the best mix for me.
Resolution: This is a printer option and will depend on how much detail your printer can put down on the paper. I tend to set it to the maximum allowed value of 2,000 and let my printer do its best to meet that number.
[Printer Setup] button: This is the same as any Windows Printer Setup button with probably one difference; the option to print Portrait or Landscape is provided here and not in some deeper page setup menu. You’re limited to a maximum paper size of A3 too, which I guess is a license limitation from Ordnance Survey.
If your route is mostly north to south then printing Portrait is going to be best, if walking east to west then print in Landscape mode. Again, experiment and see what works for you. Clicking [OK] here returns you to the print dialog box.

[Continue] button: This button launches you into what I like to think of as ‘Print Adjust’ mode. It changes the ribbon toolbar to the print ribbon and provides a way of fine tuning what it is you want to print.
The icon with a red x beside the printer backs out of the ‘Print Adjust’ mode completely. The three layers icon beside it (which only becomes available when you highlight a print square) deletes the particular print square you’ve got highlighted. See below for what I mean by ‘print square’.
Printing a Map Area
When you select Map > Print… (as opposed to printing a route or track) you are basically asking MM to print what’s currently on your map screen. This print will include the map background as well as any tracks, routes or marks that are displayed on it.
The Print Dialog box appears, as shown earlier and when you click the [Continue] button, you get a screen that looks something like the one shown below.
MM provides a green square that identifies the area of the map that you’re going to send to the printer. MM then scales that area to fit the size of the paper you identify in the printer dialog box. You can make this square larger or smaller by dragging the corners and you can move it around the screen by using the red cross that appears in the middle of the square when you click the square itself.

Clicking the Printer icon in the Ribbon will send the job to the printer.
Printing a Track or Route
The Map > Print Route/Track is only available when you have a route or track loaded in memory and selected in the Overlay Properties panel. It’s also available by right clicking a route or track and selecting Print Track (or Print Route) from the Operations context menu.
In this case, the Continue button provides the following screen (or something similar).

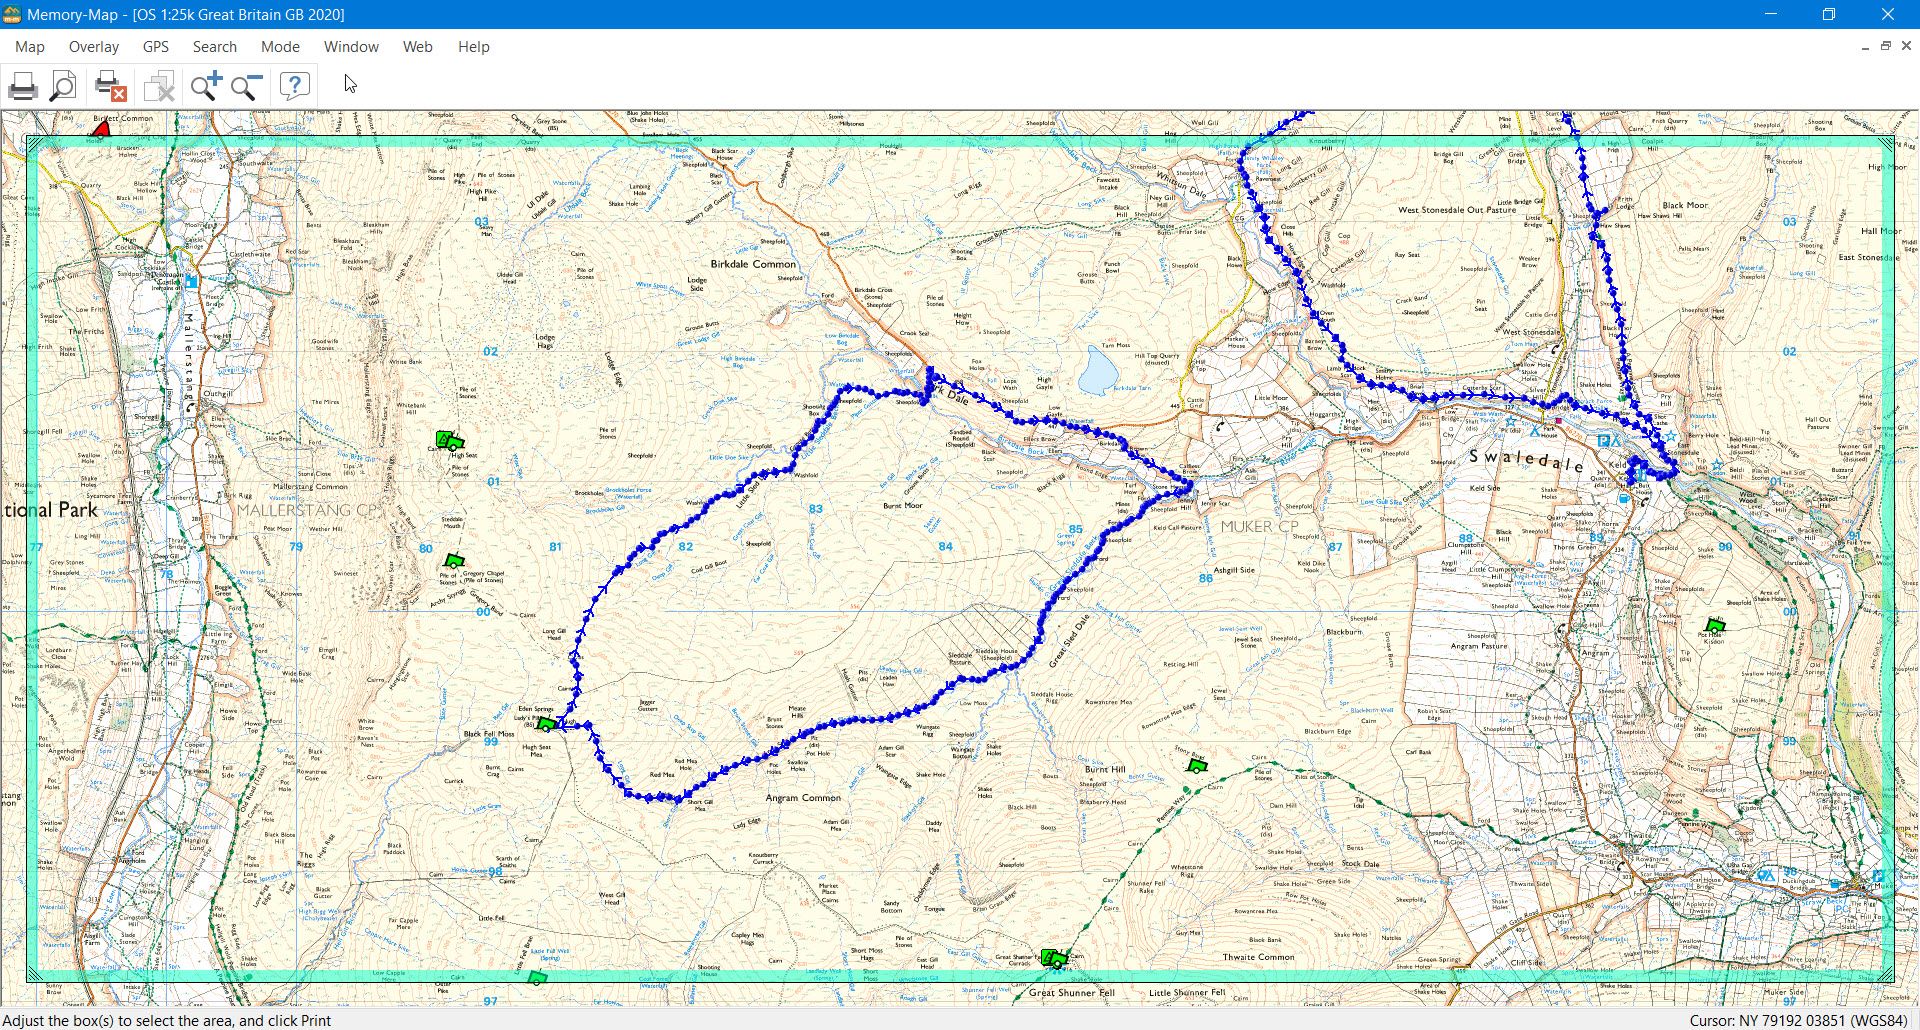
MM provides a series of green squares covering the whole route or track. If the route you are trying to print spreads over more than one map then MM will create these squares only for the map currently in memory. You will need to repeat the process for the rest of the route once you’ve finished printing the first section and then loaded the second map.
In many cases you will need to adjust the squares to create the best flow of printed maps, especially if you have a winding route like the one shown above. MM tends to make a fairly good stab at this, but more often than not I have to adjust to ensure I have enough map visible either side of the route to cover me for leaving the path.
In the example above I would move the middle green square to cover more of the area to the south of the track I have created, which may mean moving the right hand square to ensure an adequate overlap. See the finished, tweaked version below.
You will notice that the square turns red when you click on any of the edges and a red reticule appears in the middle of the square to allow you to drag it around the screen to the best position. You can also drag the corners of the square to make it smaller. It will be placed on the map at its maximum size, so you can’t make the square any larger as this is fixed to the paper size.
When you’re happy with a square, you can select another square and move that one, until you are satisfied with the final route print.
At that point you click the printer icon in the Print Toolbar ribbon and send the job to the printer.

The finalised version has better coverage either side of the route and still has sufficient overlap between printed pages. Depending on how you carry your maps on a walk will determine the best paper size to use and the best way of folding the printed sheets.
Personally, I use A5 sheets of paper and carry them back to back in an A5 waterproof document wallet. When I’ve finished with a sheet I can remove it and fold it away in my pocket, revealing the next sheet beneath it.
Printing Tips
In my experience, if you want to produce maps to take with you on a walk then it is much better to print a track than it is to print a route; mainly because the visual appearance of a modified track is far superior to that of a modified route (see previous section).
Ideally, if you want to include a highlighted route on your day walk map then it needs to be as unobtrusive as possible, while still being visible on the paper. It should not cover up essential map features like boundaries and rivers and the sort of path you are walking along. This means that you need to print a semi-transparent highlight onto the route. When you do this with a route, you still end up with the blue waypoint markers getting in the way, but not so with a track.
So the first thing to do is convert any route you’ve created, into a track. Then change the properties of the track to meet your needs. In my case I use a Yellow track line, with a Thick width, Dash style and 50% transparent. The yellow doesn’t clash with any OS map symbols or lines, the Thick is wide enough to see easily, the Dash helps prevent obscuring detail and the 50% transparency means that you can see through the highlight to the map detail below.
Happy printing.
3D Maps
I have to admit, I don’t use the 3D view very often. I think I’ve been reading maps and using MM for so long now that I can visualise contour lines without switching to 3D mode. However, there are times it may be useful and there are a couple of quirks in its use, that this section maybe useful to someone.
You can access ‘Memory Map 3D World’ by clicking the 3D icon in the planning ribbon or going to Map > 3D World in the menu. Both options will open a new window, positioned above the current map location, as if you were hovering in a helicopter.
Before we continue with the helicopter analogy, there’s a couple of things to consider when using 3D maps for the first time.
Firstly,we have a new toolbar ribbon in 3D View (see above) and no menu options.
Secondly, it’s very processor intensive (from a technical perspective, I’m not sure whether it relies solely on main CPU or also calls on GPU) and will run quite sluggishly on a slow machine, so there are a couple of configuration settings that you may want to change, to speed up the experience.
Click the gear icon second from the right, and the screen shown to the right will appear. You will need to experiment with ‘Map size’ and ‘Horizon view’ to determine the best compromise between the terrain you can view and the performance of the window.
The ability to change the ‘Sky colour’ seems quite whimsical.

We need to allow the window a few seconds to build the terrain around our position and once it has done this you can use the mouse to look around… and we’re back in the helicopter now, looking down onto the hills. Click and drag the mouse horizontally and we’ll spin around and click and drag vertically and we can look down or up. You can use the mouse scroll wheel to zoom in and out gently. A combination of all these will soon become second nature. You can also use the magnifying glass icons to zoom in and out more aggressively.
In order to unlock our static hover position, click the ‘spin’ icon (second in from the left). It will be highlighted by default and you’ll be switching it off by clicking it. Our mouse movements now feel slightly different and the mouse scroll wheel actually moves us in the direction we’re pointing. You can also move around the map by holding down the CTRL key on your keyboard and clicking and dragging the mouse. This takes a little getting used to, but works fairly well. The map will try to redraw as you move around, and on a slow machine it may take a while to catch up with you.
The two icons, third and fourth from the left, displaying split screens, do just this. They will display the 3D view in one of the panels and the regular map in the other panel. This seems to work incredibly badly on multi-screen setups and I can’t use it all because of this.
Another of the main features in 3D view is the ability to change the position of the sun, and therefore the direction of the shadows that fall on the hills we can see. Click the sun icon (five in from the left) and then drag your cursor along the horizon to simulate the position of the sun. You will see the shading on the hills change accordingly.
Have a play with 3D mode and see how you find it.
The next part of this guide can be found here: Part 6 – Importing and Exporting Data
6 thoughts on “Memory Map User Guide Pt. 5”
Thanks Stuart. I thought that would be the case. Will have to live with that. Bill
Is it possible to rotate the map (or the print frame) to print other than with the OS gridlines north-south, east west? For instance to print a map of Ullswater with the north-west shore running parallel to the long edge of an A4 sheet.
Hi Bill, that’s not possible with MM, or indeed with any Windows Print Driver that I’ve ever come across – you have your standard Portrait or Landscape rotate options and that’s it. The only way I can think of to achieve what you’re looking for is to screen print the area of the map you want to print and then rotate it manually in an image editor app and rotate it to the position you want. You can then print that rotated view in Landscape mode. I’ve just checked in MS Paint and there’s no option to rotate an image, so you’ll need something with more customisation options, like GIMP maybe?
Hope that helps, Stuart
I use export to Gps, all the time. I can go out without a map and simply follow the line on my SatNav.
Thanks for an interesting program.
Hello Stuart
I’m hoping you can help with a new problem I’m having with printing. When I try to print a route or track, it appears on a completely white background – no map at all. It appears this way in print preview too. This is a recent occurence so I must have done something to cause it, I just dont know what. I’ve installed PDF24 so that I can share routes with pals not using MM. The last time I successfully ‘printed’ a route was via PDF24 and I wonder if this has anything to do with it. If you have any suggestions I’d be very grateful.
Best wishes
Cathy Wood
I ran into the same problem it was faulty version of memorymap software. If you download the latest version it works.